On-Ramping in Crypto: How to Buy Your First Digital Assets
On-Ramping in Crypto: How to Buy Your First Digital Assets
If you're wanting to get involed with Digital Assets there’s no better way to do that than to get some skin in the game. Some readers may want to dive into more advanced topics—staking, liquidity provision, or navigating decentralised exchanges—I’m starting here: with buying crypto.

When I first started, this part wasn’t easy. Which exchange should I use? How do I avoid paying too much in fees? Why do I have to give up so much personal info just to make a purchase? These were the questions I was searching for answers to. This article will walk you through the process step by step so you can get started with confidence.
What Does “On-Ramping” Mean?
First time buying crypto is called on-ramping a term borrowed from merging onto a highway.
Your bank account holds fiat for example dollars, pounds and euros, which are traditional currencies, therefore we say that this money is on the traditional finance "highway". On-ramping is the transition that gets you from the traditional highway on to the crypto highway by exchanging yout fiat for crypto like Bitcoin or Ethereum.

However, who do we swawp the fiat for crypto with? CEXs (Centralised Exchanges) are the tollbooths. And to engange with one you have to play by their rules. You open an account, link your bank card or transfer and buy crypto with fiat. Once bought your crypto is stored in a wallet the exchange creates for you.

In practical terms, this means that the exchange controls access to your funds, so in theory an exchange could restrict your access to your crypto or prevent you from selling it when you want to, which kind of destroys the whole point of a decentralised currency.
As you can see from the crudely produced diagram above the illustration shows the Crypto flowing across the crypto highway, however, when using a CEX the reality is slightly different. When you purchase your Crypto on the CEX you are never really "on the highway", in reality you're storing your crypto with the exchange and your crypto will sit idly under the exchanges control. You still "own" it but you are limtied in what you can do with it.
For users who intend to just invest in Crypto and not stake, lend, provide liquidity, then keeping it on an exchange is simple and relatively secure. However, as a word of warning, there have been notable high profile incidents in the past where exchanges have been hacked and client funds have been drained. There's no regulatory protection for exchange user in relation to misappropriation of funds.
However, in general, it’s usually sufficient for most beginners who simply want to buy and hold crypto as a small investment. If and when you're ready to explore self-custody, you'll learn how to transfer your crypto to a wallet that only you control.
Step 1: Setting Up Your Exchange Account
Let’s begin the process. First, you’ll need to choose a CEX.
There are many to choose from, and most offer sign-up incentives to attract new users. For those starting out, I recommend Revolut X for its clean layout, strong integration with fiat banking, and low fees—just 0.09% on trades. It also supports seamless deposits from UK bank accounts.
Other large platforms like Binance, Coinbase, Kraken, and OKX offer access to a wider range of crypto products, including derivatives, staking, and advanced trading tools. However, these platforms can feel overwhelming at first, so many new users start with simpler apps before moving on.
Step 2: Completing KYC (Know Your Customer)
Once you’ve signed up, the exchange will ask you to verify your identity. This process is called KYC, short for Know Your Customer. You’ll typically need to upload a photo ID (such as a passport or driving licence) and take a selfie.
KYC is a legal requirement that centralised exchanges must follow to operate in most countries. It exists to prevent money laundering, terrorist financing, and other financial crimes. If you want to use government-backed currency to purchase crypto, you’ll need to go through this step. While some decentralised services allow users to bypass KYC, they are not beginner-friendly and often come with higher risks.

Step 3: Buying Your Crypto
With your identity verified and your account set up, you're ready to buy crypto.
Start by depositing fiat into your CEX account—usually via a bank transfer or linked debit card. Once the funds arrive, you’ll use the platform to place a buy order.
Most platforms offer two basic options:
- Market Orders, which execute immediately at the best available price.
- Limit Orders, which let you set the price you're willing to pay. The order is only filled if the market reaches that price.
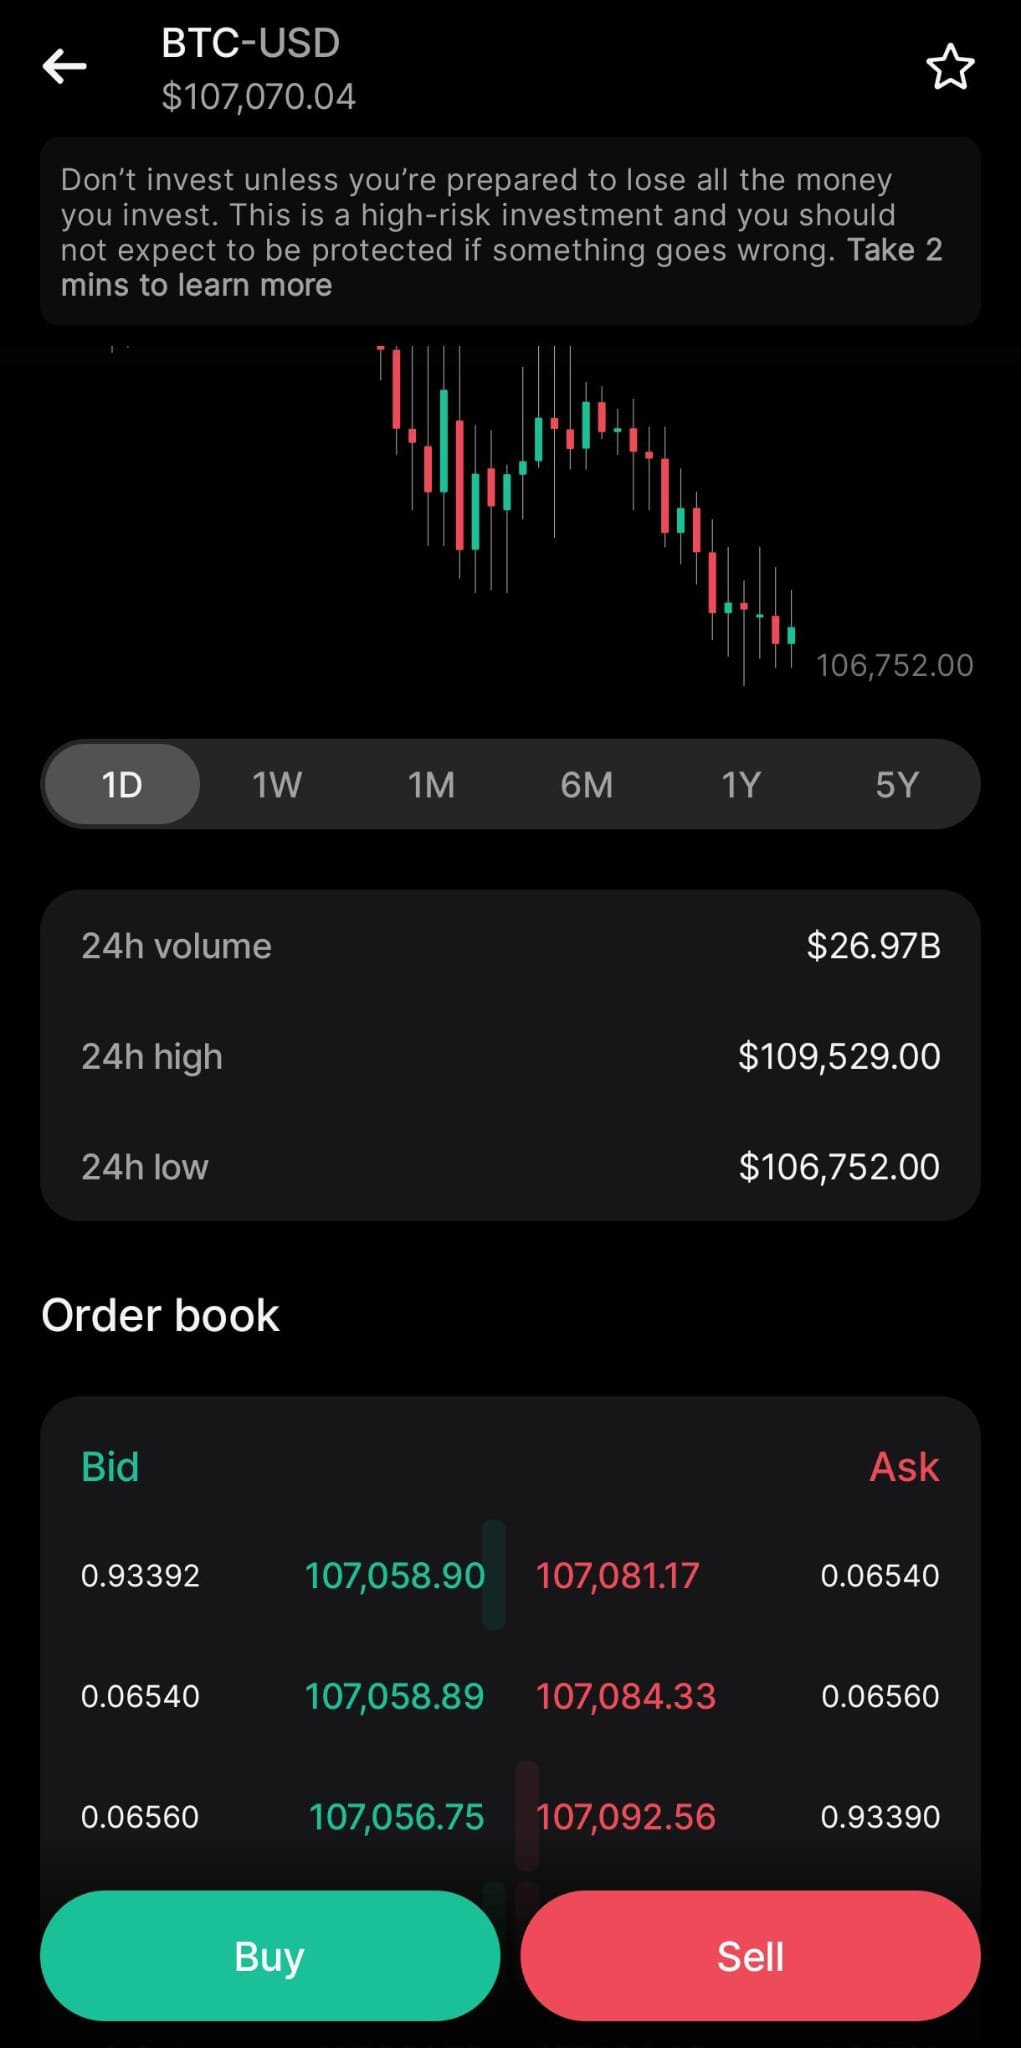
For beginners, market orders are the most straightforward way to get started. A market order in this case will result in a purchase price of Bitcoin at $107,081.17, as this is the lowest available price that someone is selling for as you can see in the screenshot.
What Happens Next?
At this point, you officially own cryptocurrency. It sits in a wallet provided and controlled by the CEX. For many, that’s enough—you can hold your crypto and watch how the market evolves.
But if you're curious about the broader crypto ecosystem, this is just the beginning. You may wish to transfer your assets to a non-custodial wallet, explore decentralised apps (DApps), or put your assets to work through staking, lending, or liquidity provision.
Where you go next depends on your goals, risk appetite, and curiosity.
Ready to explore more? Head back to CoinAlchemy’s homepage to continue the journey.